<img height="1" width="1" style="display:none" src="https://www.facebook.com/tr?id=192888919167017&amp;ev=PageView&amp;noscript=1">
Thursday,  April 25 , 2024

Linkedin Pinterest
News / Life / Food

Homemade sweet treats quite a trick

Candy making may be next wave in pandemic cooking

By Ben Mims, Los Angeles Times
Published: October 28, 2020, 6:00am
5 Photos
Homemade butterfinger bars for Halloween. (Myung J. Chun/Los Angeles Times/TNS) (Myung J.
Homemade butterfinger bars for Halloween. (Myung J. Chun/Los Angeles Times/TNS) (Myung J. Chun/Los Angeles Times) Photo Gallery

On the list of socially distant culinary projects you’ve planned to undertake these last months, making candy may be the final entry … or perhaps it’s not even on the list. But if you’ve had the patience to tackle sourdough — reading books about ferments and starters and learning all about the proper equipment and techniques to make great bread — well, you have no excuse not to apply that same dedication to making candy.

With trick-or-treating being widely discouraged and the threat of no longer being able to pilfer free goodies from your sleeping kid’s stash looming large, there may be no better time to test your candy ambition. Sure, you could just buy candy, but why not try making your own, finding satisfaction in a cooking project that you never would’ve tackled in the “before times”?

To ease you into the candy universe, here are homemade versions of two candy bars that, in my biased opinion, are the best: PayDay and Butterfinger (What can I say? I love peanuts). The PayDay bar is the easiest — you simply cook a caramelized milk syrup and then pour it over chopped salted peanuts and let it cool until it’s chewy and soft.

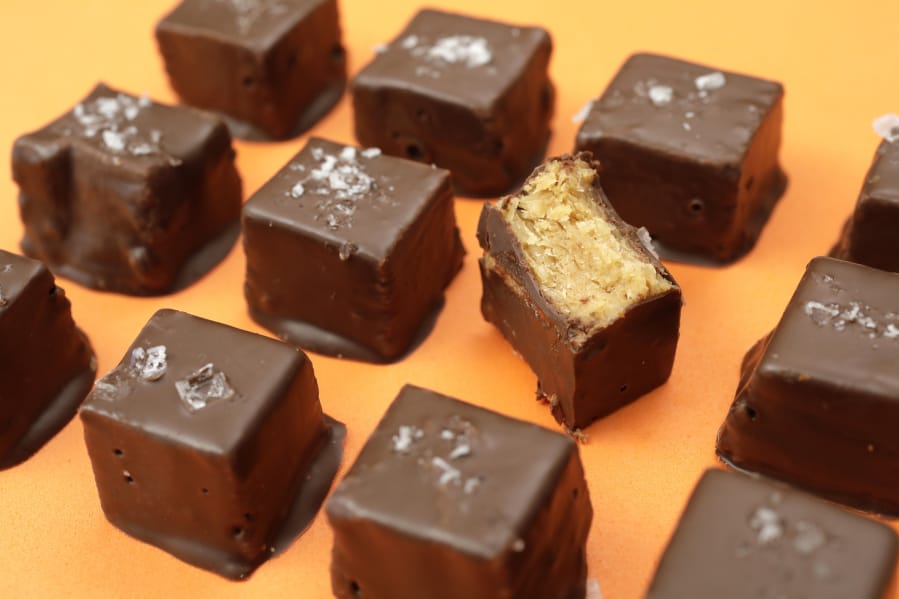
For the more adventurous, there are my homemade Butterfinger Bites. First, you cook syrup and then add baking soda to make it foam up (if you’ve ever heard of honeycomb, this is it). Finally, you mix it with peanut butter, and the result is that flaky, peanut-toffee-like texture Butterfingers are famous for. I cut the candy into small cubes and cover in chocolate (an admittedly tedious task but don’t worry, I have help for you) before finishing it off with a pinch of flaky salt.

These are the perfect introduction to candy making. Rest assured, they are easy enough to make as long as you set yourself up with the proper equipment and ingredients and follow the steps carefully. Whichever candy you make, I hope your biggest takeaway from the experience — besides dozens of delicious treats — is the knowledge that even the most daunting of cooking projects can be a delightful undertaking. With any luck, we just might make homemade candy the sourdough of the coming holiday season.

Cleaning equipment

Making candy is fun but the cleanup can be awful because you’ll be left with pots, stirrers and thermometers caked in the rock-hard candy. But there’s an easy solution: Boil everything. Professionals clean their equipment this way since boiling water both loosens and dissolves sugar; it’s the best way to get the gunk off your equipment.

Once you’re finished making your candy, fill the pot in which you cooked the candy with water and place your thermometers, stirrers and measuring cups in the water too. (If your measuring cup won’t fit, use a bigger pot to clean it.) Bring the water to a boil and let boil for 5 minutes. Pour the boiling water out, then check to make sure any stuck-on candy bits are dislodged; if not, repeat boiling with fresh water. Let everything cool before you hand-wash with soap and water (or place it in the dishwasher).

Homemade Payday Bars

Time: 1 hour 30 minutes. Yields: Makes about 6 dozen pieces

In this candy bar, a chewy, caramelized milk toffee is surrounded by roasted, salted peanuts — an unbeatable combo. If you’re allergic to peanuts, you can make this candy with any other toasted nuts. And if you like Baby Ruth bars, simply cover these bars in chocolate.

As with all candy making, be careful when cooking sugar, because it can cause serious burns if it gets on your skin. If that does happen, immediately submerge your arm in ice water to instantly seize and cool the syrup.

6 1/2 cups roasted, salted peanuts (two 16-ounce containers)

1 cup granulated sugar

2/3 cup sweetened condensed milk

1/2 cup light corn syrup

6 tablespoons unsalted butter, cut into 6 pieces

1/2 teaspoon Diamond Crystal kosher salt

Prepare your workspace: Fill a medium metal or glass bowl with the hottest possible tap water and place it in your sink. Likewise, fill a 2-cup heat-proof glass liquid measuring cup with the hottest possible tap water too, then place a candy thermometer in the water. Place a paper towel next to the measuring cup.

Pour half the peanuts onto a rimmed baking sheet lined with parchment paper or foil. Pour the other half onto a cutting board and roughly chop them so there are no whole peanuts or halves. Scrape all the chopped peanuts, including any peanut “dust” stuck to the cutting board, onto the baking sheet and combine the two peanuts together so there’s an even mix of whole and chopped nuts. Smooth the peanuts into an even layer, then use your index finger to gently form four equally spaced channels in the peanuts that run the length of the baking sheet.

In a 2- to 3-quart saucepan, add the sugar, condensed milk, corn syrup, butter, salt and 1/4 cup water and stir to combine with a long-handled, heatproof silicone spatula or wooden spoon. Place over medium-high heat and stir until the butter completely melts.

Remove the candy thermometer from the water and attach it to the side of the saucepan. Continue cooking the syrup, stirring steadily to prevent the dairy solids from scorching on the bottom of the pan, until the temperature of the syrup reaches 238 degrees. Turn off the heat but leave the pan on the stove.

Working quickly but carefully, use a kitchen towel to remove the thermometer from the pan (it will be hot) and place it in the bowl of hot water in the sink. Pour out the water in the measuring cup and dry the inside quickly with the paper towel. Pour the syrup from the saucepan into the measuring cup, scraping it from the pan to ensure you get out all the syrup. Place the spatula and saucepan in the bowl of hot water in the sink.

Immediately but with a steady hand, pour a 1 1/2 -inch-wide ribbon of syrup down the center of each channel to fill them. You should have enough syrup to fill all four channels. Once you fill them, use any leftover syrup to fill in any thin or unfilled portions of the channels so all the candy ribbons are even; place the measuring cup in the bowl of hot water in the sink.

Let the candy ribbons stand for 1 minute, then use a small spoon to dig up all the loose peanuts around the ribbons and spoon them over the exposed syrup so the ribbons are completely covered in nuts. Let stand for 5 minutes to cool and firm up. Using kitchen gloves or your bare hands (it’ll be hot but shouldn’t burn you), massage each rope, pressing peanuts into the candy rope, to form it into as even and round of a cylinder as you can. Let the ropes stand until the candy is completely cooled, at least 30 minutes. This is a great time to clean your equipment (see “Cleaning Your Equipment” below).

Using a sharp knife, cut each rope into 1-inch lengths for mini bites or 2-inch lengths for bars. Transfer each piece to a wrapper, if you like, and close to seal. Save any leftover peanuts for another use.

Make ahead: Store the candies in an airtight container at room temperature for up to two weeks.

Homemade Butterfinger Bites

Time: 1 hour 15 minutes, plus 5 hours resting. Yields: Makes 4 to 5 dozen pieces

The best part about Butterfinger bars is the crunchy filling that shears off like flaked slate. Honeycomb candy is mixed with warm peanut butter to create the layers of crunchy candy and rich nut butter that are hallmarks of the bar. As unnecessary as it might seem, don’t skip the warming of the peanut butter — it allows the two mixtures to blend more easily, giving you a smoother, more consistent candy.

When it comes time to enrobe — a fancy word for “cover completely” — the peanut candy cubes in tempered chocolate, read this sidebar, which explains an easier way to prepare the chocolate.

And as with all candy making, be careful when cooking sugar because it can cause serious burns if it gets on your skin. If that does happen, immediately submerge your arm in ice water to instantly seize and cool the syrup.

1 1/2 cups smooth peanut butter

1 teaspoon Diamond Crystal kosher salt

1 teaspoon pure vanilla extract

1/2 teaspoon baking soda

Nonstick cooking spray (or butter)

1 cup granulated sugar

3/4 cup light corn syrup

1 tablespoon unsalted butter

1 1/2 pounds milk or dark chocolate, prepared for enrobing (see note, above)

Flaky sea salt (optional)

Prepare your workspace: Fill a medium metal or glass bowl with the hottest possible tap water and place it in your sink. Likewise, fill a 2-cup heat-proof glass liquid measuring cup with the hottest possible tap water, then place a candy thermometer in the water. Have a large heat-proof silicone spatula at the ready as well.

Place the peanut butter and salt in the largest metal or heat-proof bowl you have and stir together. In a small bowl, combine the vanilla and the baking soda and set aside with a small spoon in the bowl. Grease an 8-inch square metal or foil baking pan with nonstick cooking spray and line the bottom and two sides with a strip of parchment paper, letting the excess hang over the edges of the pan. Heat the oven to 200 degrees.

In a 2- to 3-quart, small saucepan, combine the sugar, corn syrup and 1/4 cup water and stir to combine with a long-handled heatproof silicone spatula or wooden spoon. Place over medium-high heat and bring to a simmer. As soon as bubbles appear around the edge of the syrup, cover the pan and let cook for 3 minutes; this allows the steam from the syrup to condense on the lid and run back down the side of the pan into the syrup, which helps wash away any undissolved sugar crystals that could make the syrup seize. At this same time, place the bowl of peanut butter in the oven to warm up.

After the 3 minutes, uncover the pan. Remove the candy thermometer from the water and attach it to the side of the saucepan. Add the butter and continue cooking the caramel, stirring occasionally to prevent the dairy solids from scorching on the bottom of the pan, until the temperature of the syrup reaches 285 degrees. When the candy reaches 275 degrees, remove the bowl of peanut butter from the oven and place it on a kitchen towel or other heat-proof surface.

Once the candy reaches 285 degrees, work quickly but carefully: Immediately turn off the heat and use a kitchen towel to remove the thermometer from the pan (it will be hot) and place it in the bowl of hot water in the sink. Use the spoon in the small bowl to quickly stir the vanilla and baking soda together again, then pour it into the syrup. Stir the syrup with the large spatula until it foams up. Then quickly pour the foaming syrup mixture over the peanut butter, scraping it all out of the pan; quickly place the pan in the bowl of hot water in the sink.

Holding the edge of the bowl with a kitchen towel (remember, it’s hot), quickly fold the foaming syrup into the warm peanut butter until the two mixtures form a muddy-looking mixture; the mixture will not be completely homogeneous but, rather, should look like striations of syrup in the peanut butter. Immediately scrape the mixture into the prepared baking pan and gently press it into the corners of the pan and smooth the top. Let the candy cool completely until set, at least 1 hour. This is a great time to clean your equipment.

Place a cutting board over the baking pan and invert them together so the block of candy falls onto the board. Remove the baking pan and peel away and discard the parchment paper. Using a slicing knife or long chef’s knife, slice the block into 1-inch wide strips, then into 1-inch square pieces; depending on how the edges crumble, you will end up with between four and five dozen pieces.

With your chocolate prepared, begin enrobing the candy pieces: Line a large baking sheet with parchment paper or foil and set it next to your bowl of chocolate. Working with one piece at a time, drop a cube in the chocolate and use a small spoon to cover the cube fully in melted chocolate. Using a three-prong dipping fork or scoop or a long-tined dinner fork, scoop up the cube and then lightly rap the neck of the fork against the rim of the bowl to allow any excess chocolate to drain back into the bowl. Scrape the underside of the fork against the rim of the bowl to clean off any remaining drips, then transfer the candy to the prepared baking sheet, letting it slide off the fork. Repeat with the remaining candy pieces until they’re all coated in chocolate.

After all the candy is coated in chocolate, sprinkle the tops with a small pinch of flaky salt, if you like. Let the candies stand until the chocolate is fully set and dry to the touch, at least 4 hours, before serving or wrapping in candy wrappers.

Make ahead: Store the candies in an airtight container at cool room temperature for up to 2 weeks.

Stay informed on what is happening in Clark County, WA and beyond for only
$9.99/mo
Loading...